In the past, a LOT of Habbos have asked us how to create videos of the Habbo client – mainly because they want to show their friends, customers and audiences how good they are at building, using Wired furni or hosting games (among a LOT of other things, of course!) Depending on whether you are using a Mac or a PC, you’ll need to look at a different part of this blog (this is because different software and procedures are required).
Once you have clicked on ‘New Screen Recording’, a little Quicktime Player box will appear on your screen; to start recording you just have to click on the red ‘record’ button.
You’ll then be presented with the option to record the entire screen by clicking the screen, or recording just a part of the screen. To record just a part of the screen, drag the mouse pointer over the area you want to record and let go to record.

Once you’ve finished, go to the Quicktime Player icon on the bottom toolbar and right-click and select ‘Stop Screen Recording’.
Once you’ve stopped the recording, you need to save it. Go to the top toolbar; click on ‘File’, then ‘Save’.
After you’ve clicked, a new window will appear called ‘Open Media’. You need to go to the ‘Capture Device’ tab on the far right, and from the pull down menu to the right of ‘Capture mode’, you need to select ‘Desktop’. TIP: before recording your Desktop, make sure there is absolutely NOTHING confidential in view there. So be careful to close any programs or browser windows with anything personal in them.
In the same ‘Open Media’ window, there is an option to change the frame rate. To create a smooth-running and decent quality video, we’d advise you switch it up to around 30.00 f/s. Once you’ve done this, click the ‘Convert / Save’ button at the bottom of the ‘Open Media’ screen.

Now the ‘Convert’ window will appear. Check that the ‘Destination’ is where you want to it be saved, and if you want to change the resolution click on the little tool icon next to the ‘Profile’ drop-down menu. Then, hit the ‘Start’ button! And YOU’RE DONE!
For Habbos that use Mac
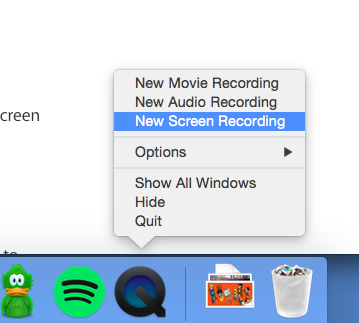
If you have a Mac, LUCKY YOU! This means you don’t need to download any extra software to actually record your screen. You’re winning. First, open up Quicktime Player (you can usually find it in the Mac’s Launchpad in the ‘Other’ box). Once you have it open, you need to create a ‘New Screen Recording’. You can do this by right clicking on the Quicktime Player icon on the bottom toolbar and then selecting it from there.
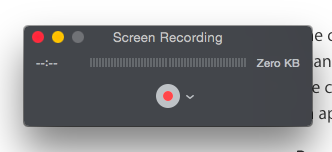
Once you have clicked on ‘New Screen Recording’, a little Quicktime Player box will appear on your screen; to start recording you just have to click on the red ‘record’ button.

You’ll then be presented with the option to record the entire screen by clicking the screen, or recording just a part of the screen. To record just a part of the screen, drag the mouse pointer over the area you want to record and let go to record.

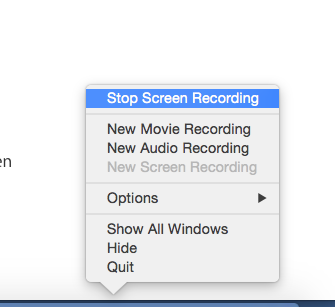
Once you’ve finished, go to the Quicktime Player icon on the bottom toolbar and right-click and select ‘Stop Screen Recording’.

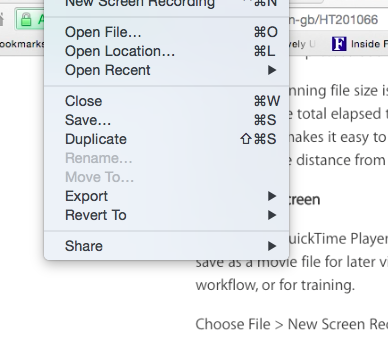
Once you’ve stopped the recording, you need to save it. Go to the top toolbar; click on ‘File’, then ‘Save’.

For Habbos that use PC
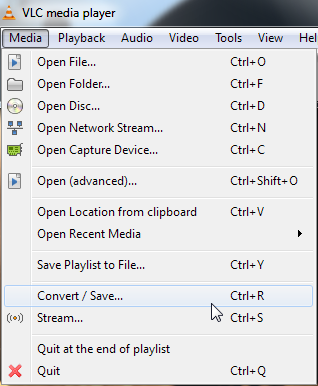
OK – so the process to record screens if you are a PC user is still simple so don’t panic, but PCs don’t (generally) have a built in tool for this purpose. So, you’re going to have to download a bit of software called VLC Media Player. While this is a very well known program and the above link goes to a Google-verified website, PLEASE get permission from the person whose computer you are using BEFORE downloading and installing it! Once you have downloaded it, open up a new VLC Media Player Session and click ‘Media’ and ‘Convert / Save’ (strange option to begin a new recording, but believe us – this is correct!)
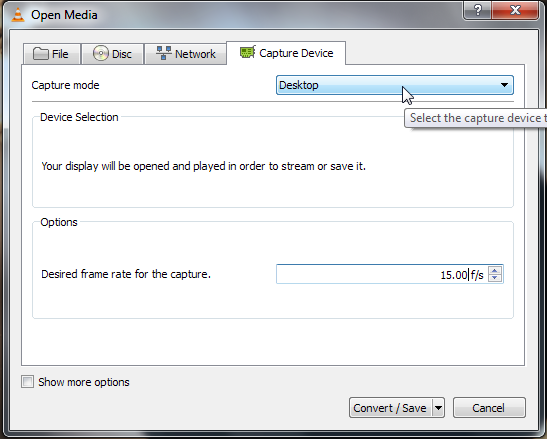
After you’ve clicked, a new window will appear called ‘Open Media’. You need to go to the ‘Capture Device’ tab on the far right, and from the pull down menu to the right of ‘Capture mode’, you need to select ‘Desktop’. TIP: before recording your Desktop, make sure there is absolutely NOTHING confidential in view there. So be careful to close any programs or browser windows with anything personal in them.

In the same ‘Open Media’ window, there is an option to change the frame rate. To create a smooth-running and decent quality video, we’d advise you switch it up to around 30.00 f/s. Once you’ve done this, click the ‘Convert / Save’ button at the bottom of the ‘Open Media’ screen.

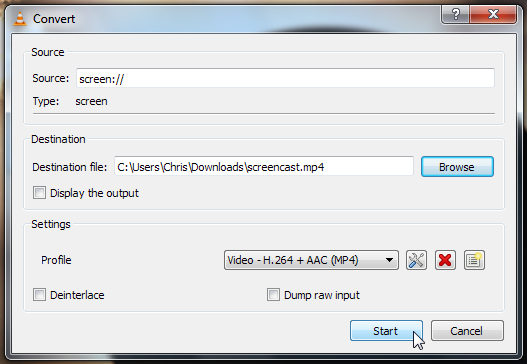
Now the ‘Convert’ window will appear. Check that the ‘Destination’ is where you want to it be saved, and if you want to change the resolution click on the little tool icon next to the ‘Profile’ drop-down menu. Then, hit the ‘Start’ button! And YOU’RE DONE!


